Monday, October 4, 2010
A Glimpse Inside's Birthday Giveaway
Totally wishing it was my birthday, but since its not, I'm entering in a giveaway from Allison's birthday. check it out HERE


Wednesday, September 22, 2010
Wicked Craft
Long time no craft....
I've been sick a little lately and not in the craftin' mood. Thankfully, I'm up and runnin' again.
I found a new favorite: A Glimpse Inside and she had an AWESOME tutorial for subway art. I've always loved the subway art but I can't write neat so I thought I'd never paint one, but then this chick used her cricut and I have one of those, so I thought SCORE!!!
I had this beautiful shelf that doesn't hang correctly on the wall, so I never put it up.

Since I didn't have a canvas, I decided to use the shelf and will just set it up on a table when I decorate for Halloween this weekend.
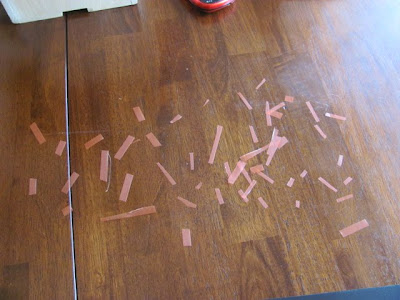
These sweet babies kept me sane while I was cutting all the itty bitty pieces of tape to go behind all the letters.


Here's me because I was just so proud of myself I thought I deserved a picture!
(except pardon the no makeup)

LOVE IT!!!


I've been sick a little lately and not in the craftin' mood. Thankfully, I'm up and runnin' again.
I found a new favorite: A Glimpse Inside and she had an AWESOME tutorial for subway art. I've always loved the subway art but I can't write neat so I thought I'd never paint one, but then this chick used her cricut and I have one of those, so I thought SCORE!!!
I had this beautiful shelf that doesn't hang correctly on the wall, so I never put it up.

Since I didn't have a canvas, I decided to use the shelf and will just set it up on a table when I decorate for Halloween this weekend.
These sweet babies kept me sane while I was cutting all the itty bitty pieces of tape to go behind all the letters.


Here's me because I was just so proud of myself I thought I deserved a picture!
(except pardon the no makeup)

LOVE IT!!!


Friday, August 6, 2010
Baby flowers
I have a friend, that after 3 boys, she's finally having a little girl. So I decided to make something really girly!


My husband said "that thing is going to be as big as her head" (and this one is my favorite)

I got brave and bought feathers today. I've been eyeing ANA PAULA's FEATHER HEADBAND for so long, but I thought it was beyond my abilities. But I decided to try today and I came up with this totally CHIC barrett to clip on this adorable hat

and then I got jealous of how fabulous Baby Lucy will look in that hat, so I made myself a headband.


My husband said "that thing is going to be as big as her head" (and this one is my favorite)

I got brave and bought feathers today. I've been eyeing ANA PAULA's FEATHER HEADBAND for so long, but I thought it was beyond my abilities. But I decided to try today and I came up with this totally CHIC barrett to clip on this adorable hat

and then I got jealous of how fabulous Baby Lucy will look in that hat, so I made myself a headband.


Star wreath
I bought flowers today to make some barretts for a baby shower - I had some leftover and decided to decorate this yard sale baby.
$2.00 ( I probably should've bargained but I really liked it and they go to church with me, so I decided to be sweet....)


Simple but pretty - The flowers scream August to me. I'm ready for fall.


$2.00 ( I probably should've bargained but I really liked it and they go to church with me, so I decided to be sweet....)


Simple but pretty - The flowers scream August to me. I'm ready for fall.


Wednesday, July 21, 2010
Topiary Project
I got this *gorgeous* baby at a yard sale for $1 - I knew it had potential and that the supplies alone were worth much more than $1, so I snatched it up. (I think my husband thought I was crazy on this one)

I took leftover material from a dress refashion and hot glued it onto the pot - I know I know, fabric on a pot, weird, but I loved the fabric and had flowers to match.

So I took leftover flowers that I had from my wreaths and from making flowers for my daughter's hair and stuffed (and glued) them into the spheres. Speaking of glue...

the glue gun was NOT my friend tonight.
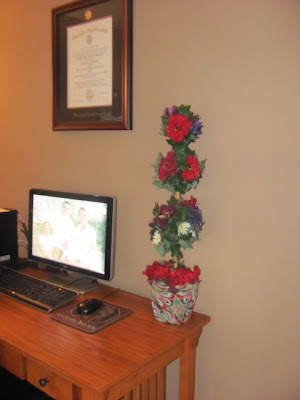
Here's the finished project sitting in our playroom/office


I took leftover material from a dress refashion and hot glued it onto the pot - I know I know, fabric on a pot, weird, but I loved the fabric and had flowers to match.

So I took leftover flowers that I had from my wreaths and from making flowers for my daughter's hair and stuffed (and glued) them into the spheres. Speaking of glue...

the glue gun was NOT my friend tonight.
Here's the finished project sitting in our playroom/office


Sunday, July 11, 2010
MZ's *NEW* bedroom
Since MZ has decided to be a big girl now (she turns two this week and became potty trained last week) we thought she deserved a new bedroom.
We were on our way to Hobby Lobby when I spotted a bedroom set at a thrift store out in the dirt. I LOVED it and begged my husband to buy it for her. He had complete faith that I could turn it into something beautiful. It was a dirty yellow color.


While the hubby was taking off the hardware and taking out the drawers he stumbled upon a black bra - back behind one of the drawers. I wonder if the owner is missing it? We thought it was quite nasty!

I cleaned the pieces, and painted them white. I spray painted the bed because it was metal. And we spray painted the knobs.

I am so happy with the way it all turned out!!!


We were on our way to Hobby Lobby when I spotted a bedroom set at a thrift store out in the dirt. I LOVED it and begged my husband to buy it for her. He had complete faith that I could turn it into something beautiful. It was a dirty yellow color.


While the hubby was taking off the hardware and taking out the drawers he stumbled upon a black bra - back behind one of the drawers. I wonder if the owner is missing it? We thought it was quite nasty!

I cleaned the pieces, and painted them white. I spray painted the bed because it was metal. And we spray painted the knobs.

I am so happy with the way it all turned out!!!


Monday, June 28, 2010
*New* July 4th wreath
I was over at my favorite Fireflies and Jellybeans looking at all the amazing chicks that entered stuff into her weekly Show off your stuff party and I found an amazing wreath at Paisley Pink Polkadots.
Of course mine looks NOTHING like her's but I just used her idea to revamp my July 4th wreath.
My mom bought this wreath for me 5 years ago. It's seen better days.

So I decided to give it a little makeover.
I used 3 wreaths that I bought from the dollar store.

And some fabric (including burlap and red stripped fabric that was leftover from my mom making my sons very first halloween costume)

I wanted to repaint all the hearts and stars but I didn't have the right color craft paint and didn't want to spend any more money, so I decided to use what I had. And I got a little glitter happy...

I LOVE my new wreath - it rocks!


Of course mine looks NOTHING like her's but I just used her idea to revamp my July 4th wreath.
My mom bought this wreath for me 5 years ago. It's seen better days.

So I decided to give it a little makeover.
I used 3 wreaths that I bought from the dollar store.

And some fabric (including burlap and red stripped fabric that was leftover from my mom making my sons very first halloween costume)

I wanted to repaint all the hearts and stars but I didn't have the right color craft paint and didn't want to spend any more money, so I decided to use what I had. And I got a little glitter happy...

I LOVE my new wreath - it rocks!


Step to Planter
My parents just got a new set of steps for their pool and so they no longer needed, this step that the ladder was attached to. I asked if I could have it and I'm pretty sure my mom thought I was crazy!


I thought it'd be a good idea to scrape the 20 years of paint off - it didn't go anywhere, so then it was a good idea to sand it - it still didn't go anywhere - so I finally decided to just paint over it.


I put some of the black weed protector sheet down in the bottom, because its still poreous but it would keep the soil from coming out the bottom (this stuff was already at my house)so all I paid for were the cute little plants, which were $5.97 total. Under $6 for this project.


I thought it'd be a good idea to scrape the 20 years of paint off - it didn't go anywhere, so then it was a good idea to sand it - it still didn't go anywhere - so I finally decided to just paint over it.


I put some of the black weed protector sheet down in the bottom, because its still poreous but it would keep the soil from coming out the bottom (this stuff was already at my house)so all I paid for were the cute little plants, which were $5.97 total. Under $6 for this project.


Sunday, May 16, 2010
*NEW* pillows
After living in our new house for almost 6 months, I've decided the living room was a little gloomy - it needed some bright colors.
I went to JoAnn's on Saturday morning (was there, actually, before they opened the door).
I worked on my pillows for a long time (cumulatively) on Saturday and then finished them on Sunday after church. Once the first one was done, I had a rhythm and they went relatively fast.
I was using my existing pillows to help cut down on costs.
My couch BEFORE


New Pillows

(has a ruffle on one side - this idea was from THIS tutorial at CHEAP CHIC HOME)

(two flowers on the edge - I think they're a little too far to the edge, but they'll have to do - these flowers were made using THIS tutorial from PINK PAPER PEPPERMINTS and THIS tutorial from THE TIDY NEST)
Couch AFTER

(I plan on getting some more pillows on here, but that will come with time -and money)
The rocking chair pillow BEFORE

(MZ wouldn't move out of the way)
AFTER pillow

( flower was made using THIS tutorial from MOLLY CHICKEN)

The pillows all have velcro on one end, that way I can take them off and wash them if needs be. (my first time with sewing velcro went nicely)


I went to JoAnn's on Saturday morning (was there, actually, before they opened the door).
I worked on my pillows for a long time (cumulatively) on Saturday and then finished them on Sunday after church. Once the first one was done, I had a rhythm and they went relatively fast.
I was using my existing pillows to help cut down on costs.
My couch BEFORE


New Pillows

(has a ruffle on one side - this idea was from THIS tutorial at CHEAP CHIC HOME)

(two flowers on the edge - I think they're a little too far to the edge, but they'll have to do - these flowers were made using THIS tutorial from PINK PAPER PEPPERMINTS and THIS tutorial from THE TIDY NEST)
Couch AFTER

(I plan on getting some more pillows on here, but that will come with time -and money)
The rocking chair pillow BEFORE

(MZ wouldn't move out of the way)
AFTER pillow

( flower was made using THIS tutorial from MOLLY CHICKEN)

The pillows all have velcro on one end, that way I can take them off and wash them if needs be. (my first time with sewing velcro went nicely)


Subscribe to:
Comments (Atom)


